
Most small kitchen ideas start with storage products. Yet a compact kitchen usually breaks down at two simpler points: the counter where food gets prepared, and the shelves a cook can reach without a stool. Rental homes leave little room to spare: the median multifamily unit completed for rent in 2025 measured 1,000 square feet1. This article sits under the small kitchen storage overview and goes deep on one angle: ideas that protect prep space and keep everyday tools within an arm’s reach.
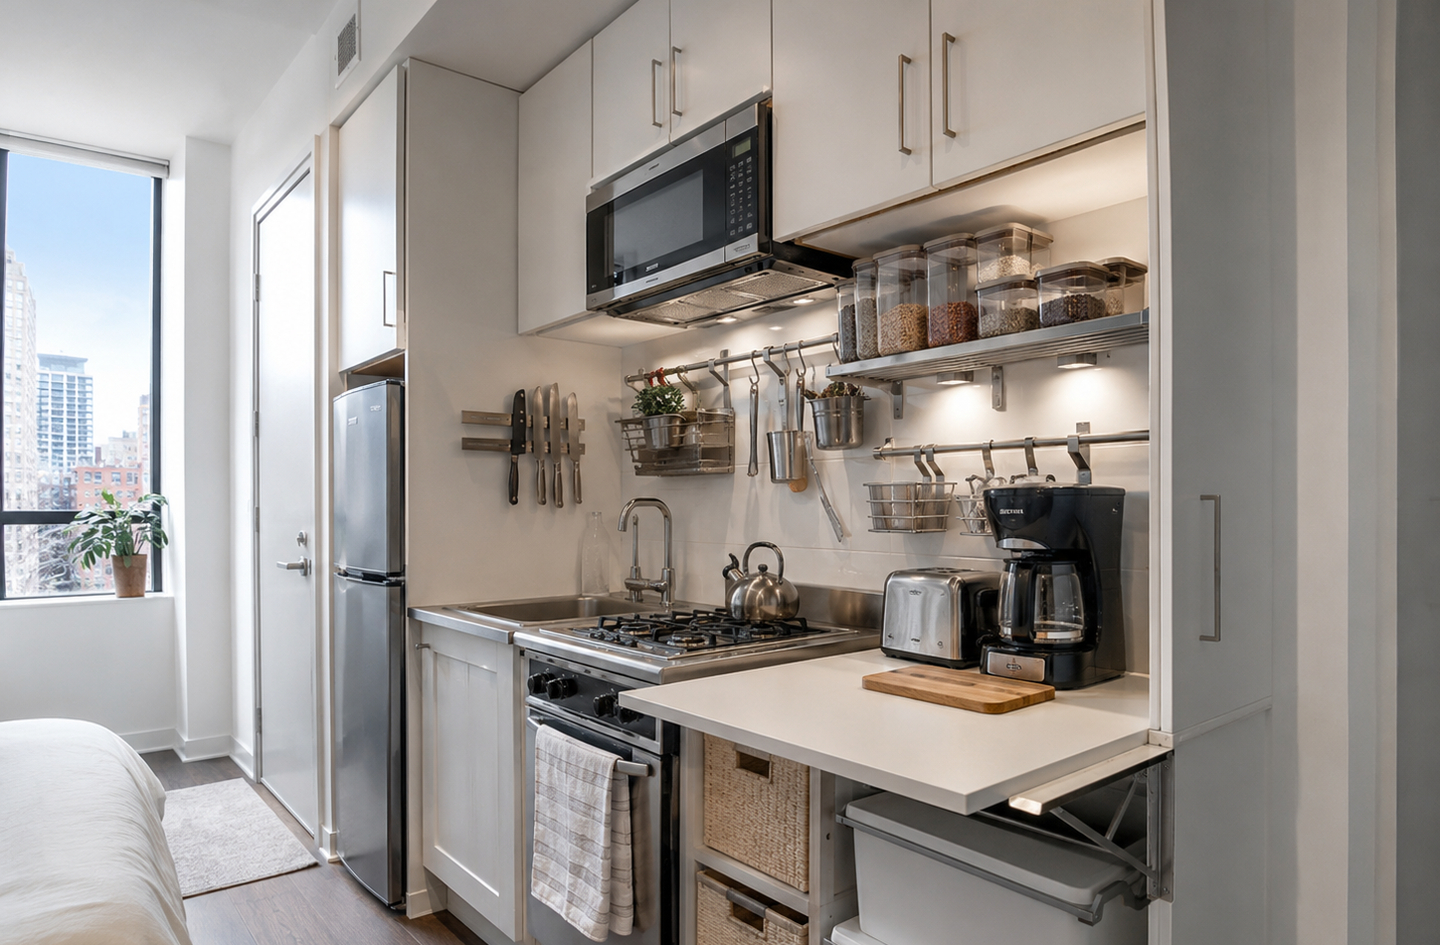
Quick Answer
Which small kitchen ideas make the biggest difference to counter space and reach?
Protect one continuous prep run first; university extension guidance sets the mixing counter at a minimum of 36 inches2. Then give each appliance a landing zone, and move daily items into the band between 15 and 48 inches above the floor3. Storage products come after those two decisions, not before them.
Key Takeaways
- Plan in order: map the cooking routine, protect the prep run, give appliances landing zones, assign storage by first use, and decorate last.
- Reach is measurable. Accessibility standards, drawn for wheelchair users, cap an unobstructed forward reach at 48 inches, and at 44 inches over a counter deeper than 20 inches3.
- Aisle width decides the layout. Accessibility standards ask for 40 inches between opposing counters in a pass-through kitchen4, so very narrow rooms often work better with counters on one wall.
- The common misconception is that a small kitchen needs more storage. Most need storage moved to the right height and the right work center, which frees counter space without adding a single cabinet.
Small Kitchen Ideas Start With Counter Space and Reach
A small kitchen works when two measurable resources are planned before anything is bought: clear counter length beside each appliance, and storage inside the comfortable reach band. Every idea in this list serves one of those two resources.
A work center is an area of the kitchen where the appliance, the counter, the supplies and the tools for one task are arranged together. University of Missouri Extension guidance describes the sink center as the most frequently used area in the kitchen2. Planning a small kitchen by work center, rather than by cabinet, is what keeps each tool near the task it serves.
What does counter space actually mean in a small kitchen?
Counter space is not the total area of countertop. It is the clear, usable length beside the appliance that needs it, at the moment the cook needs it. A long run broken up by a toaster, a knife block and a dish rack can offer less working surface than a short run kept completely clear.
What does reach mean, in inches?
The reach range is the band of heights a person can use without crouching or stretching. Federal accessibility standards set the unobstructed forward reach at 48 inches maximum and 15 inches minimum above the floor3. Those limits are drawn for a person using a wheelchair, and they govern public buildings, not private homes.
The band is conservative: standing adults reach higher, but daily items kept inside it work for everyone in the household.
If an idea neither adds clear counter length nor moves a daily item into the reach band, it is decoration rather than storage. A small kitchen cannot spare the space for it.
1. Protect One Continuous Prep Run – Best for People Who Cook Most Days
The single most valuable idea in a small kitchen is one uninterrupted stretch of counter reserved for preparing food. University of Missouri Extension guidance recommends a minimum of 36 inches of counter for mixing and preparation2. Chopping, measuring and assembling all happen there, so a kitchen without it pushes prep onto the stove top or the dining table.
The same guidance suggests 24 to 36 inches of counter on the right side of the sink and 18 to 30 inches on the left, for a right-handed cook2. Federal accessibility standards ask for at least one counter section 30 inches wide as a kitchen work surface4. Both point the same way: one clear run of roughly three feet is the working minimum.
Where should the prep run sit?
The strongest position is between the sink and the range. Food moves in one direction: washed at the sink, cut on the prep run, cooked on the range. A cook working in that line never carries a dripping colander across the room or turns away from a hot pan.
What if no run in the kitchen reaches three feet?
Very small kitchen ideas on a budget start here, because the fix rarely needs construction. A cutting board sized to sit over the sink adds prep surface whenever the sink is idle. A cover over two unused burners does the same on the range, as long as it is removed before the burners are lit.
Where neither is enough, a rolling cart or a fold-down wall shelf can add a temporary prep run that disappears after the meal. Both are renter-friendly and reversible.
Decide where the prep run lives before choosing any storage product, because every other idea in this list either feeds that run or protects it from clutter.
2. Give Every Appliance a Landing Zone – Best for Counters That Fill Up Instantly
A landing area is a clear patch of counter beside an appliance where hot pans, groceries or dishes can be set down the moment they leave it. Without one, the cook holds a heavy pot while hunting for space, or parks it somewhere unsafe.
Extension guidance treats 15 inches of counter on either side of the range or cooktop as the minimum2. For the refrigerator, the same guidance recommends an 18-inch counter beside the door handle2. Those two figures turn a vague goal into a tape-measure check that takes a couple of minutes.
Why does the range landing zone matter for safety?
The range side carries the highest stakes. U.S. fire departments responded to an estimated 170,000 home cooking fires in 20215. Unattended equipment was the leading contributing factor in nonconfined home cooking fires, at 37%5.
A clear landing zone beside the range is where a hot pan goes when it comes off the heat. The U.S. Fire Administration also advises turning pot handles toward the back of the stove5. Paper towels, cookbooks and wooden utensil crocks belong elsewhere.
“Cooking is, by far, the leading cause of home fires and home fire injuries.”
U.S. Fire Administration, FEMA5
Can two appliances share one landing zone?
Yes, and sharing is the central move in a compact kitchen. When the refrigerator stands at one end of the prep run, the first stretch of that run serves as the refrigerator landing zone. Groceries land there, then slide straight into prep. The range side can share the far end, as long as that stretch stays clear while the burners are on.
Measure the landing zones before buying any organizer, because a counter that fails these checks will refill itself however many bins are added.
3. Store Each Tool at Its Point of First Use – Best for Kitchens Where Everything Lives Elsewhere
Point-of-use storage means every item is kept at the work center where it is first needed, not where it happens to fit. Extension guidance applies this to the mixing center, which it says should hold most packaged, canned and bottled foods, along with baking pans and preparation tools2.
“The sink center is the most frequently used area in the kitchen and should be central to other major centers you plan.”
Marilyn W. Caselman and Lelland L. Gallup, University of Missouri Extension2
What belongs at each work center?
Sort items by the first thing that happens to them, not by category. Colanders, cutting boards, dish soap and vegetable brushes start at the sink. Knives, mixing bowls, measuring cups and dry goods start at the prep run.
Pans, spatulas, oils, salt and pot holders start at the range. Food storage containers start beside the refrigerator. Plates and glasses belong between the drying rack and the table.
What happens to items used once a week or less?
Weekly and seasonal items move outward. A roasting pan, a stand mixer or holiday serving platters can live above the reach band, below it, or outside the kitchen entirely. That clears prime space near each center for the tools used every day. Storage where behavior happens is the rule.
Point-of-use storage frees more counter space than any organizer, because it removes the reason items get left out in the first place: their real home is too far from the task.
4. Move Daily Items Into the Reach Band – Best for Upper Cabinets Nobody Opens
The reach band is where daily storage belongs, and a small kitchen rarely has enough of it to waste. Accessibility standards set the unobstructed high forward reach at 48 inches and the low reach at 15 inches above the floor3. Over a counter, the band shrinks further, because the cook leans across the counter depth.
Where the reach depth exceeds 20 inches, the standards lower the high forward reach to 44 inches, with a maximum reach depth of 25 inches3. A standard base counter puts most of the wall above it at or beyond that depth. In practice, the upper shelves of a typical wall cabinet sit above this conservative band, so they suit weekly items better than daily ones.
How should the three height zones be assigned?
Use three zones and give each a job. Below the low reach line, store heavy and rarely used items: a stockpot, bulk dry goods or a slow cooker. Inside the band, store everything used daily: plates, glasses, everyday pans and the spices that get used most.
Just above the band, standing adults can still reach weekly items. The top shelves, the ones that need a step stool, hold seasonal and backup items. Extension guidance adds a related height rule: standing work surfaces suit most cooks at 7 to 8 inches below elbow height2.
Is a step stool part of the system?
A folding step stool is the honest answer to storage above the reach band. Give it a fixed home, such as a slim gap beside the refrigerator, or the top shelves go unused.
Moving five daily items down one shelf usually does more for a small kitchen than adding a new cabinet, because it turns storage the cook avoids into storage the cook uses.
5. Swap Low Doors for Drawers and Pull-Outs – Best for Deep Base Cabinets
Base cabinets are the deepest storage in a small kitchen and the hardest to reach, because their back half sits low and in shadow. A pull-out shelf is a shelf mounted on runners that slides forward, bringing the back of the cabinet to the cook instead of the cook to the back of the cabinet. Home buyers value the idea: 74% rated pull-out shelves essential or desirable in a national builder survey6.
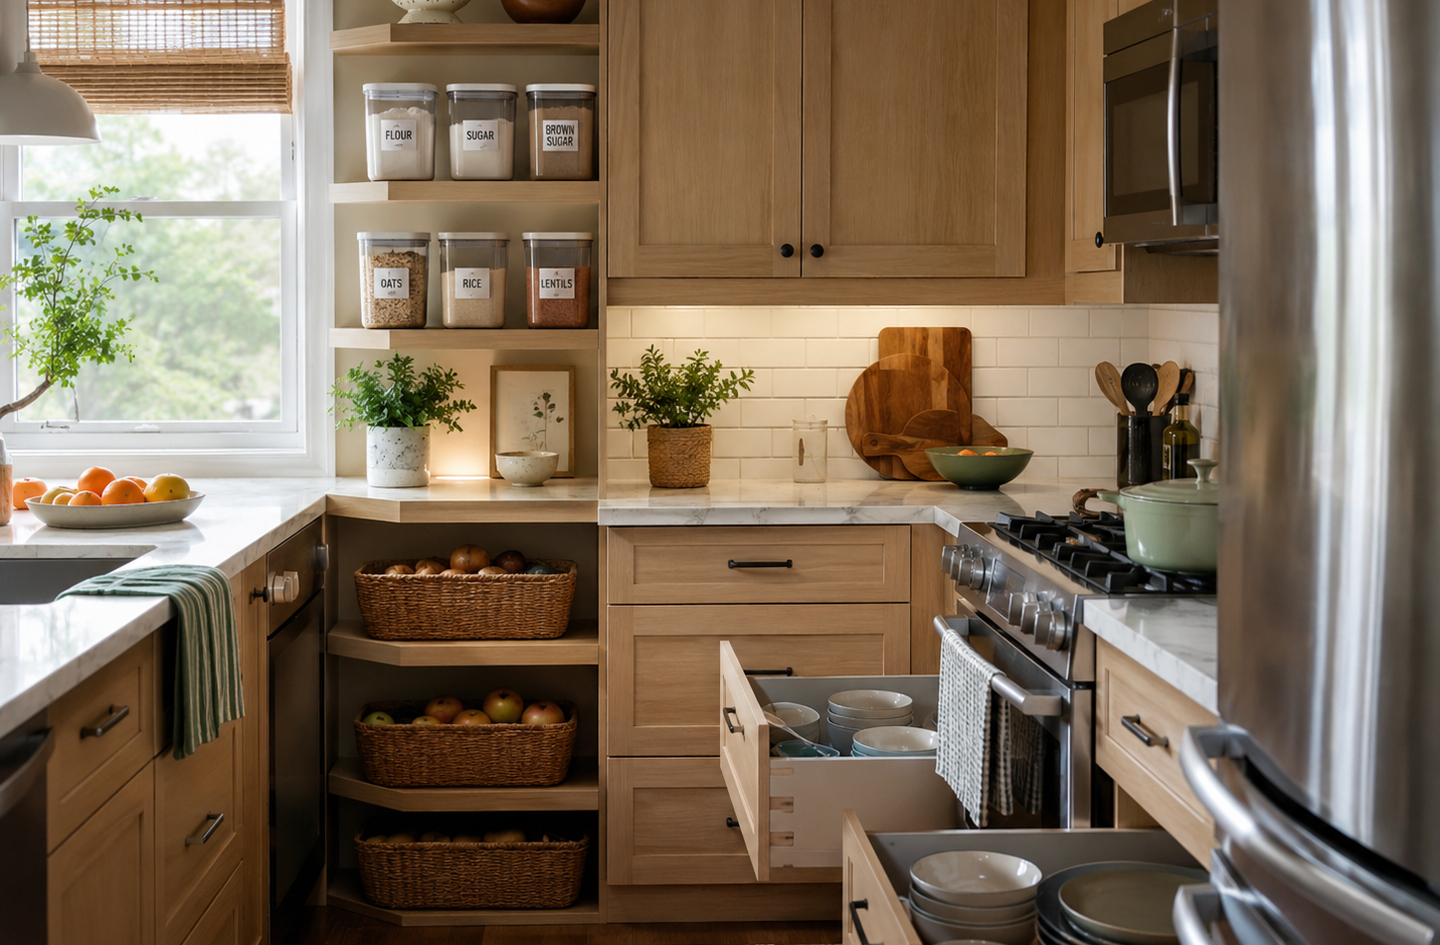
The same survey found that 80% of buyers rated a walk-in pantry essential or desirable6. A small kitchen rarely has room for one. Deep drawers and pull-outs deliver the part of a pantry that matters most day to day: every item visible and reachable from where the cook stands.
Which cabinets should change first?
Start with the base cabinet under the prep run. It holds the bowls, pans and dry goods that the prep run needs, so a drawer there saves the most crouching per meal.
Corner base cabinets are a special case. A turntable, also called a lazy Susan, brings the back of a blind corner within reach without the cost of a full corner mechanism.
What is the renter-friendly version?
Freestanding wire pull-out baskets sit on the cabinet floor and slide on their own frame, and many need no screws at all. Anything screwed into a rental cabinet needs landlord approval first.
Drawers and pull-outs are the most effective use of base cabinet depth, because they turn the hardest storage to reach into storage a cook can scan in one look.
6. Run a Rail Along the Backsplash – Best for Renters Short on Drawers
The backsplash band is the strip of wall between the counter and the wall cabinets, and its lower part falls inside even the conservative reach band. A rail or bar mounted there holds utensils, a paper towel roll and a few hooks, all within easy reach and all off the counter.
Keep the rail for the daily set: the spatula, ladle, tongs and whisk that would otherwise crowd a utensil crock on the counter. A magnetic knife strip on the same band removes the knife block, which is often the bulkiest object on a short prep run. Over a counter deeper than 20 inches, accessibility standards lower the high reach to 44 inches3. Mount the rail low on the backsplash rather than just under the cabinets.
What should not go on the rail?
Anything used weekly or less should stay in a drawer, or the daily tools get harder to grab. Avoid hanging cloth, paper or wooden items directly beside the cooktop, where heat and spatter reach them.
Kitchens with no upper or lower cabinets at all need a fuller wall system. The guide to kitchens without cabinets compares rails, open shelving and freestanding units for that case.
Does a rail need drilling?
Most rails attach with screws, so renters should ask the landlord first. Adhesive rails suit light loads only, and a tension pole is the fully reversible option.
A backsplash rail earns its place when it removes at least one object from the prep run; if it only adds new tools, it adds clutter at eye level instead.
7. Choose the Layout by Aisle Width – Best for Galley and Pass-Through Kitchens
Aisle width decides whether a narrow kitchen should carry counters on one wall or two. A galley kitchen is a kitchen with counters on two opposing walls and a walkway between them, and it is a common compact kitchen design in apartments. Accessibility standards set 40 inches as the minimum clearance between opposing counters in a pass-through kitchen4.
Residential planning guidance asks for more. University of Missouri Extension recommends no less than 48 inches between base cabinets or appliances opposite each other2. In a U-shaped kitchen, the accessibility minimum rises to 60 inches between opposing counters4. Adding standard counter depth to those aisles shows how wide a room must be for each layout.
What should a kitchen narrower than the galley minimum do?
When a room cannot hold two counter runs and a working aisle, a single run on one wall usually performs better. The second wall then holds shallow storage: a rail, a pegboard or open shelves about 12 inches deep. That keeps the aisle wide enough for an open dishwasher door and a person standing at it.
Moving a sink, range or gas line to reshape a layout is plumbing, gas or electrical work. That belongs with a licensed contractor and, for structural walls, an architect or engineer who can see the specific home.
In a narrow room, the aisle is a fixed cost, so every inch spent on a second counter run is an inch taken from the space the cook stands and moves in.
8. Add Counter That Moves Instead of Counter That Stays – Best for Kitchens Too Narrow for an Island
A rolling cart or a drop-leaf surface adds prep space for the length of a meal, then rolls or folds away to give the aisle back. Buyers want both extra surface and a place to eat: 74% rated a central island, and 80% rated table space for eating, as essential or desirable6. A movable piece can do both jobs.
Plan a clear standing spot at the cart, not just a spot for the cart. Accessibility standards size the clear floor space where a wheelchair user parks at an element at 30 by 48 inches minimum3. That footprint is a generous check for whether a person can stand and work at a cart without blocking the path behind them.
Cart, island or drop-leaf table?
A locking rolling cart suits kitchens where the extra counter is needed daily but the floor is needed in between. A compact fixed island suits kitchens wide enough to keep a working aisle on every side; the guide to sizing a compact island covers that clearance math.
A drop-leaf table on an adjacent wall can serve as prep surface before a meal and dining surface during it. The ideas for a drop-leaf eating nook show how to fit one without blocking the walkway.
Movable counter is the best fit for very small kitchens, because it adds surface only when a task needs it and returns the floor the rest of the day.
9. Clear the Counter by Rule, Not by Mood – Best for Counters That Refill Themselves
A counter stays clear when a written rule decides what may live on it, rather than a weekly burst of tidying. The simplest rule is a daily-use test. An item keeps a counter spot only if it is used every day and sits at its point of first use.
Apply the test once and most counters lose a few items: a stand mixer used monthly, or a knife block that a wall strip can replace. Each removal returns clear length to a landing zone or the prep run. The full set of rules for what earns counter space is in the guide to small kitchen counter organization.
How does a counter stay clear after the first sort?
Design for the reset. A counter that takes one pass with a cloth to clear at night stays clear; a counter that needs ten items moved does not. Give each counter item a defined spot, such as a tray for oils beside the range, so the reset is putting things back rather than deciding where they go.
Rules beat willpower on a small counter, because a rule makes the decision once while tidying asks for the same decision every evening.
Small Kitchen Design Ideas Compared
The nine ideas differ in which resource they protect, the measurement that governs them, and whether they need drilling. Each governing figure can be checked with a tape measure before anything is bought.
| Idea | Resource it protects | Governing figure | Drilling needed | Renter fit |
|---|---|---|---|---|
| Continuous prep run | Counter space | 36 in minimum for mixing and prep | None | Yes |
| Appliance landing zones | Counter space | 15 in beside the range, 18 in beside the refrigerator handle | None | Yes |
| Point-of-use storage | Counter space and reach | Each item stored at the center where it is first used | None | Yes |
| Daily items in the reach band | Reach | 15 to 48 in above the floor, 44 in over a deep counter | None | Yes |
| Drawers and pull-outs | Reach | Back of the base cabinet brought to the front | Built-in versions | Freestanding baskets only |
| Backsplash rail | Counter space and reach | Mounted low enough to stay under 44 in over the counter | Usually | With landlord approval |
| Layout by aisle width | Counter space | 40 in minimum aisle, 48 in recommended | Only if fixtures move | Shelf wall only |
| Movable counter | Counter space | 30 by 48 in clear standing spot at the cart | None | Yes |
| Counter rules | Counter space | Daily-use test for every counter item | None | Yes |
Start with the rows that need no drilling: six of the nine ideas need nothing fixed to a wall, and most cost only an afternoon of moving things.
How We Selected These Ideas
The nine ideas in this list were selected through research and layout analysis, not hands-on product testing. Each idea had to do one of two things in a kitchen of apartment size. It had to add clear counter length where a task needs it, or move daily storage into the reach band.
Each idea was then compared on four criteria:
- Counter effect: whether it adds, protects or frees clear counter length beside an appliance or on the prep run.
- Reach effect: whether it moves daily items into the band between the low and high reach lines.
- Renter fit: whether it works without drilling, or with removable fixings and landlord approval.
- Reset effort: how much work it takes to keep the idea working after the first week.
This article links to no products and carries no paid placements. Small Space Logic is reader-supported, and no retailer influenced which ideas appear here or how they rank.
Frequently Asked Questions
What are the best small kitchen ideas for more counter space?
Protect one clear prep run first, since extension guidance sets the mixing counter at a minimum of 36 inches2. Then clear the landing zones beside the range and refrigerator. Add movable surface, such as a rolling cart or a sink cover board, only after those two steps.
How high should everyday kitchen items be stored?
Store daily items between about 15 and 48 inches above the floor, a conservative reach band that federal accessibility standards draw for wheelchair users3. Over a counter deeper than 20 inches, treat 44 inches as the upper limit. Keep heavy, rarely used items below that band and seasonal items above it.
How wide should the aisle in a small galley kitchen be?
Accessibility standards set 40 inches between opposing counters in a pass-through kitchen4, and extension guidance recommends 48 inches2. With two standard-depth runs, that means a room roughly 88 to 96 inches wide. Narrower rooms usually work better with counters on one wall.
How much counter space does a small kitchen need beside the stove?
Extension guidance treats 15 inches on either side of the range or cooktop as the minimum2. That space is where hot pans land when they come off the heat. In a very small kitchen, one side can overlap with the prep run if it stays clear while cooking.
What are very small kitchen ideas on a budget?
The cheapest ideas move things rather than buy them. Bring daily items into the 15 to 48 inch reach band3, store each tool where it is first used, and clear the landing zones. After that, a sink cover board, a step stool and freestanding pull-out baskets add the most for little cost.
Limitations and Edge Cases
- The reach figures come from accessibility standards for public buildings. Individual reach varies with height and mobility, so measure the household’s own comfortable reach before assigning shelves.
- The extension counter recommendations assume a right-handed cook. A left-handed cook may prefer the longer counter on the left side of the sink.
- Ideas that relocate a sink, range, gas line or outlet are construction work. They need a licensed plumber, electrician or contractor, and renters need written landlord approval first.
References
Methodology: every sourced figure in this article comes from an independent published source, and the chart’s room widths are Small Space Logic calculations from those figures (a federal statistics agency, two chapters of the federal accessibility standards, a university extension service, a federal fire agency and a home-building trade survey) and links to the page that carries it; the article is written by Small Space Logic’s founder and updated when a source or recommendation materially changes.
- U.S. Census Bureau – Highlights of 2025 Characteristics of New Housing.
- University of Missouri Extension – Kitchen Planning: Work Centers (GH5669), Marilyn W. Caselman and Lelland L. Gallup, reviewed October 1993, updated September 2017.
- U.S. Access Board – Guide to the ADA Standards, Chapter 3: Building Blocks, sections 305 Clear Floor or Ground Space and 308 Reach Ranges, 2010 ADA Standards for Accessible Design.
- U.S. Access Board – Guide to the ADA Standards, Chapter 8: Special Rooms, Spaces, and Elements, section 804 Kitchens and Kitchenettes, 2010 ADA Standards for Accessible Design.
- U.S. Fire Administration – Cooking fire safety, home fire prevention guidance, FEMA (undated).
- National Association of Home Builders – Eye on Housing, Home Buyers are Looking for Amenity-Loaded Kitchens and Bathrooms, Eric Lynch, September 10, 2024.
Conclusion
A small kitchen gains the most from ideas that protect two resources: clear counter beside each task, and daily storage inside the reach band. Protect the prep run, clear the landing zones, store each tool where it is first used, and move daily items to the heights a cook can reach. Engineer the layout first, decorate second.
For how this angle fits the wider topic of compact kitchen storage, see the small kitchen storage overview.